Build Your Own Cold Frame: A Step-by-Step Guide
Ready to extend your gardening season and give your seedlings a head start? Building a cold frame is a rewarding and affordable project that lets you nurture your plants while protecting them from harsh weather conditions. A cold frame essentially acts as a mini-greenhouse, providing a warm and sheltered environment for delicate seedlings. It traps the sun's heat, creating a microclimate that promotes growth and allows you to start your gardening journey earlier in the spring or extend it well into the fall.
This guide will lead you through the entire process of building your own cold frame, step-by-step. From choosing the right materials to assembling the structure, we’ll cover everything you need to know. So, gather your tools, pick out your materials, and let's get started on building your very own cold frame.
Choosing Your Cold Frame Design
The first step is deciding on the design that suits your needs and space. Cold frames come in various shapes and sizes. You can opt for a simple, rectangular design or a more elaborate curved one. Consider the following factors:
Size:
The size of your cold frame depends on the number of plants you intend to grow. A small cold frame might be perfect for starting a few seedlings, while a larger one can accommodate a wider variety of plants.
Materials:
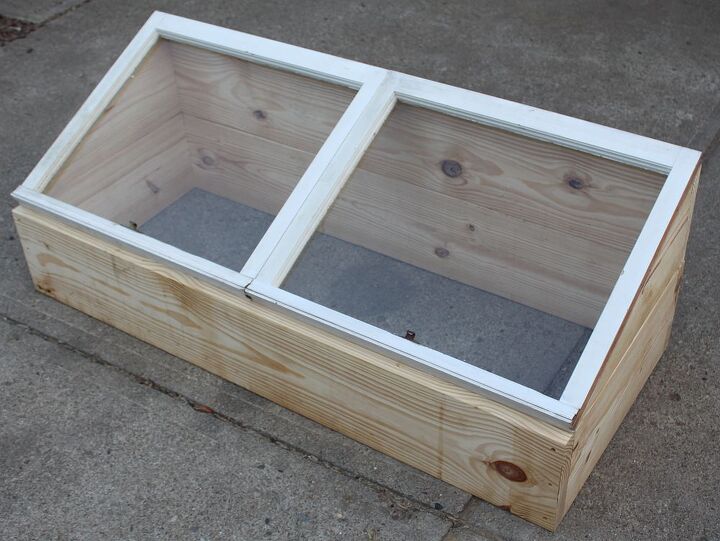
Cold frames can be built using a variety of materials, including wood, brick, stone, or even recycled materials. Consider the aesthetic you want to achieve and the durability of the materials. Wood is a popular choice due to its affordability and ease of working with, while brick and stone offer a more robust and long-lasting structure.
Location:
Choose a sunny spot for your cold frame, ideally with a southern exposure to maximize sunlight. Ensure the area is well-drained to prevent waterlogging.
Gathering Your Materials and Tools
Once you have a design in mind, you'll need to gather the following materials and tools.
Materials:
- Wood (for frame and lid)
- Hinges
- Screws and nails
- Glazing putty or silicone sealant
- Glass, polycarbonate sheets, or acrylic sheets for the lid (ensure it allows sunlight to pass through)
- Optional: weatherproof paint or stain for the exterior
Tools:
- Saw
- Drill
- Measuring tape
- Level
- Screwdriver
- Hammer
- Safety glasses and gloves
Step-by-Step Construction Guide
Now, let’s dive into the construction process, ensuring a sturdy and functional cold frame.
Step 1: Building the Frame
1. Cut the wood to your desired dimensions for the frame. Ensure that the corners form right angles for a stable structure. 2. Use screws or nails to secure the wood pieces together, creating a rectangular or square frame. 3. Check the frame for levelness and adjust as needed. 4. If you are using wood, apply weatherproof paint or stain to protect the wood from moisture and extend its lifespan.
Step 2: Assembling the Lid
1. Cut the wood for the lid to the same dimensions as the frame. 2. Attach the hinges to the lid using screws, ensuring they are strong enough to support the lid's weight. 3. If you are using glass or polycarbonate sheets, apply glazing putty or sealant around the edges to create a watertight seal.
Step 3: Installing the Lid
1. Attach the lid to the frame using the hinges. 2. Ensure that the lid opens and closes smoothly and that the latch is secure.
Step 4: Preparing the Base
1. Choose a sunny location for your cold frame and ensure it is well-drained. 2. If your soil is uneven, you can use gravel or pavers to create a level base. 3. You can also add a layer of insulation, such as straw or shredded leaves, to the base for extra warmth.
Step 5: Placing the Cold Frame
1. Carefully place the cold frame on the prepared base, ensuring it is level. 2. You can use bricks or stones to help stabilize the frame if needed.
Using and Maintaining Your Cold Frame
With your cold frame built, you can now start growing your favorite plants. Follow these tips to maximize its effectiveness:
Planting and Watering:
1. Fill the cold frame with suitable potting mix or soil. 2. Water your plants regularly, ensuring the soil is moist but not waterlogged. 3. Monitor the temperature inside the cold frame and adjust the ventilation accordingly. 4. Open the lid slightly on warmer days to allow for air circulation and prevent excessive humidity.
Winterizing:
1. In colder regions, you can use a layer of straw or burlap over the lid to provide extra insulation during winter. 2. Check for leaks or drafts in the frame and seal them as needed.
Cleaning:
1. Regularly clean the interior and exterior of the cold frame to remove debris and pests. 2. Remove any dead plants or foliage to prevent the spread of diseases.
By following these simple steps, you can enjoy a long and fruitful gardening season with your DIY cold frame. It's a rewarding project that will enhance your gardening experience, allowing you to cultivate a wide variety of plants and enjoy fresh produce for a longer duration.
0 comments:
Post a Comment
Note: Only a member of this blog may post a comment.